This article gives step-by-step setup instructions of Channeltivity’s Deal Registration integration with HubSpot. An overview of Channeltivity’s Deal Registration Integration can be found in this article.
Step 1: Set Up HubSpot Field
You'll need to create a checkbox field on the Deal object in HubSpot. This field is used for integration purposes only. When a Deal is pushed into HubSpot, Channeltivity will update the field on the Deal automatically. Doing so allows Channeltivity to flag/identify the records that are syncing with Channeltivity. This makes the integration run more efficiently, and it reduces HubSpot API calls.
Step 2: Enable the Integration in Channeltivity
A HubSpot Admin will need to enter their HubSpot Credentials into Channeltivity to authorize Channeltivity access to HubSpot by going to Settings > HubSpot Integration > Overview & Authorization. Learn more about this topic here: HubSpot Integration Authorization/Credentials Setup.
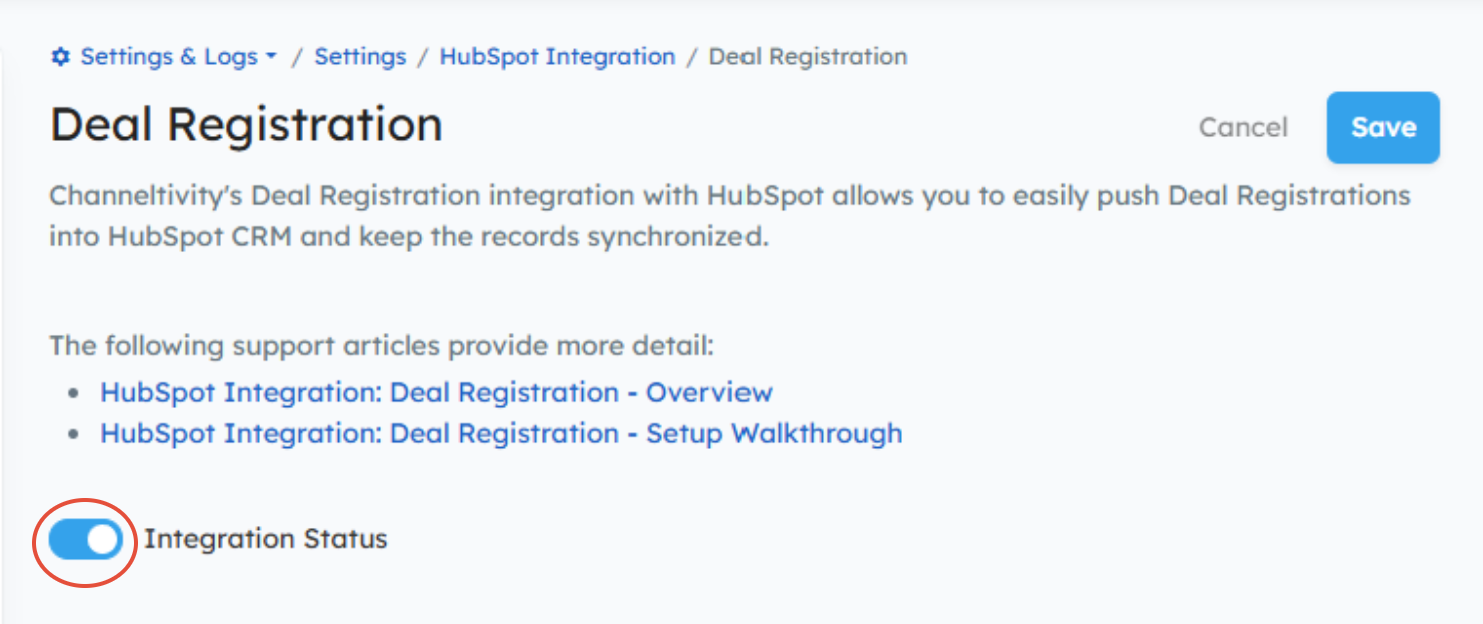
Once the systems are connected, go to Settings > HubSpot Integration > Deal Registration.
Click the toggle switch to enable the integration.
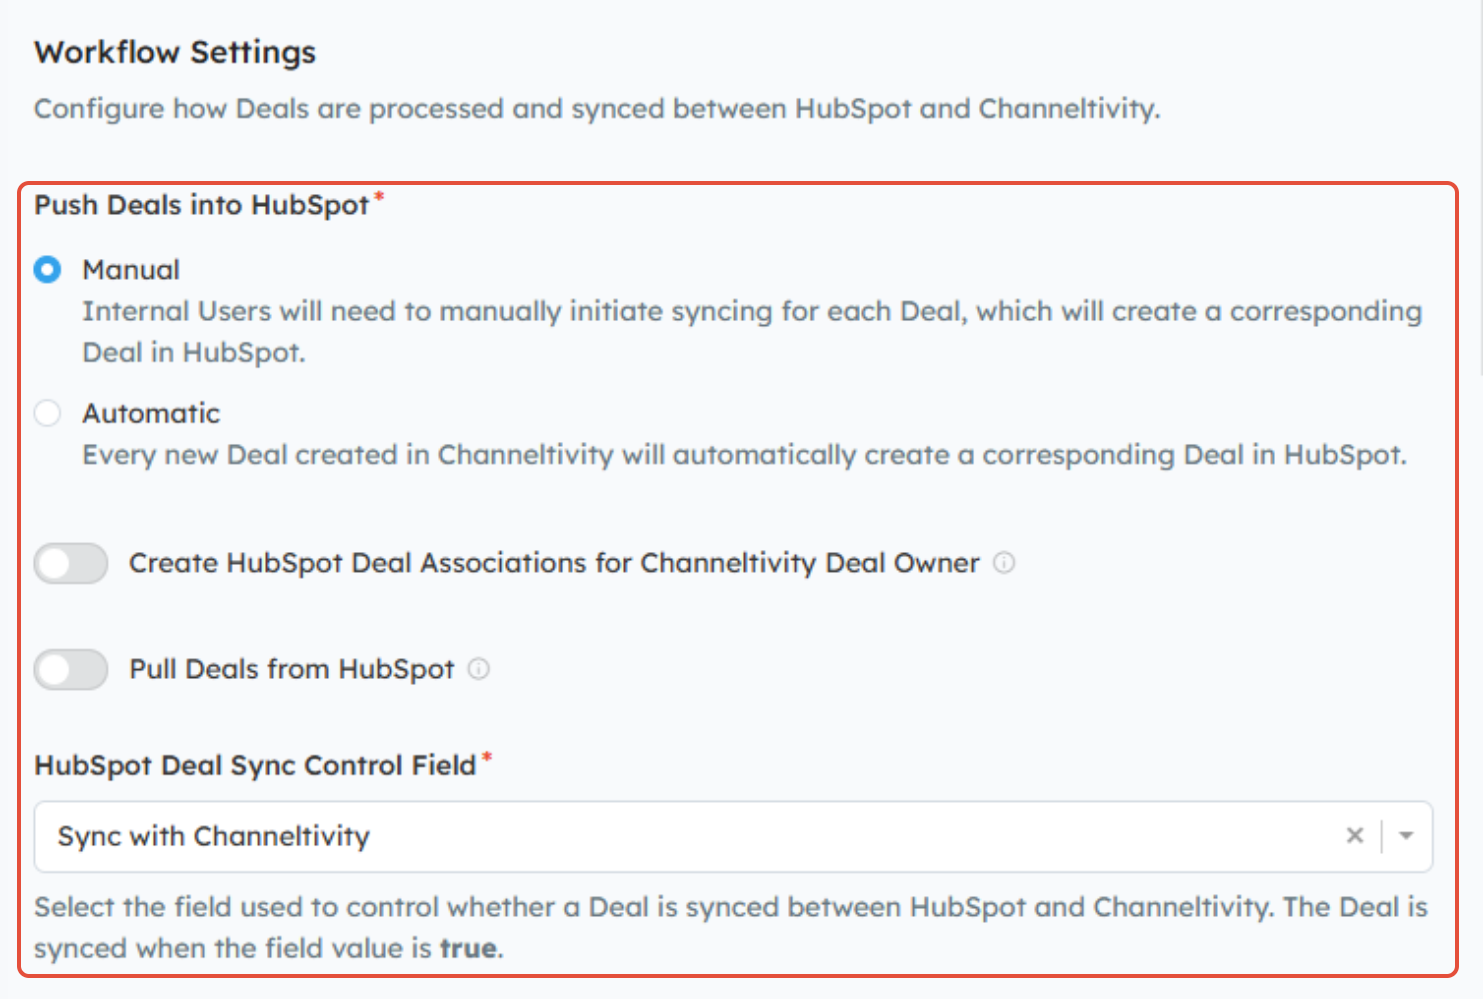
Scroll down the page to configure the following items under the Workflow Settings section:
- Manual or Automatic Sync - Choose whether you want Channeltivity to automatically create a Deal in HubSpot whenever a Deal is registered or whether you want the manual control over which Deals get pushed into HubSpot.
- HubSpot Deal Associations for Deal Owner User and Organization (OPTIONAL): By default, Channeltivity associates the End User/Customer Company and Contact with the Deal when it’s synced to HubSpot. However, you can enable this setting to also associate the Partner (or Distributor) Company and Contact that own the Deal in Channeltivity (Deal Owner Organization and User) with the Deal in HubSpot upon creation. This way, both the End User/Customer and Partner (or Distributor) are tied to the Deal in HubSpot, giving you a more complete picture of every Deal that’s synced to HubSpot. Learn more about this topic in this article.
- Pull Deals from HubSpot (OPTIONAL) - If you're looking to import existing Deal Registrations from HubSpot into Channeltivity or create new Deal Registrations in Channeltivity based on automatic renewal Deals in HubSpot, check out: How do I import Deals from HubSpot into my PRM as Deal Registrations? after completing the steps in this article to configure the integration's Deal Import feature.
- HubSpot Deal Sync Control Field: Select the "Sync with Channeltivity" checkbox that you created in Step 1 from the dropdown menu.
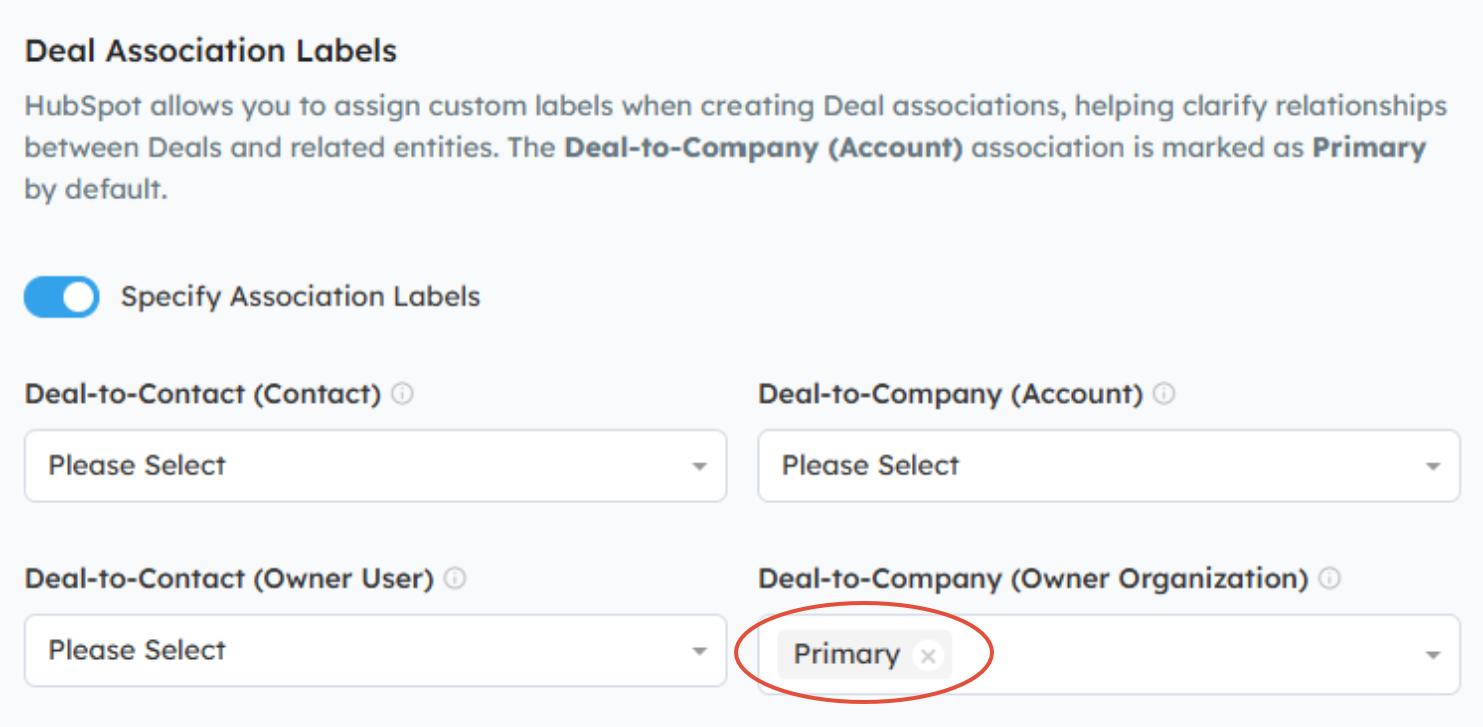
Step 3: Assign Deal Association Labels (OPTIONAL)
By default, Channeltivity sets the End User / Customer Company as the Primary Company on the Deal in HubSpot upon creation. If this default behavior meets your needs, you do not need to enable this setting.
However, if you wish to change this behavior for Companies and/or Contacts, you'll enable the "Specify Association Labels" setting.
From there, you'll use the dropdown menus to select the appropriate Association Labels for:
- Deal-to-Contact (Contact) --- Deal-to-Company (Account): Represents the End User/Customer Contact and Account associated with the Deal in Channeltivity.
- Deal-to-Contact (Owner User) --- Deal-to-Company (Owner Organization): Represents the Partner or Distributor User and Organization associated with the Deal in Channeltivity. You'll need to enable the "Create HubSpot Deal Associations for Channeltivity Deal Owner" setting in Step 2 to configure this setting.
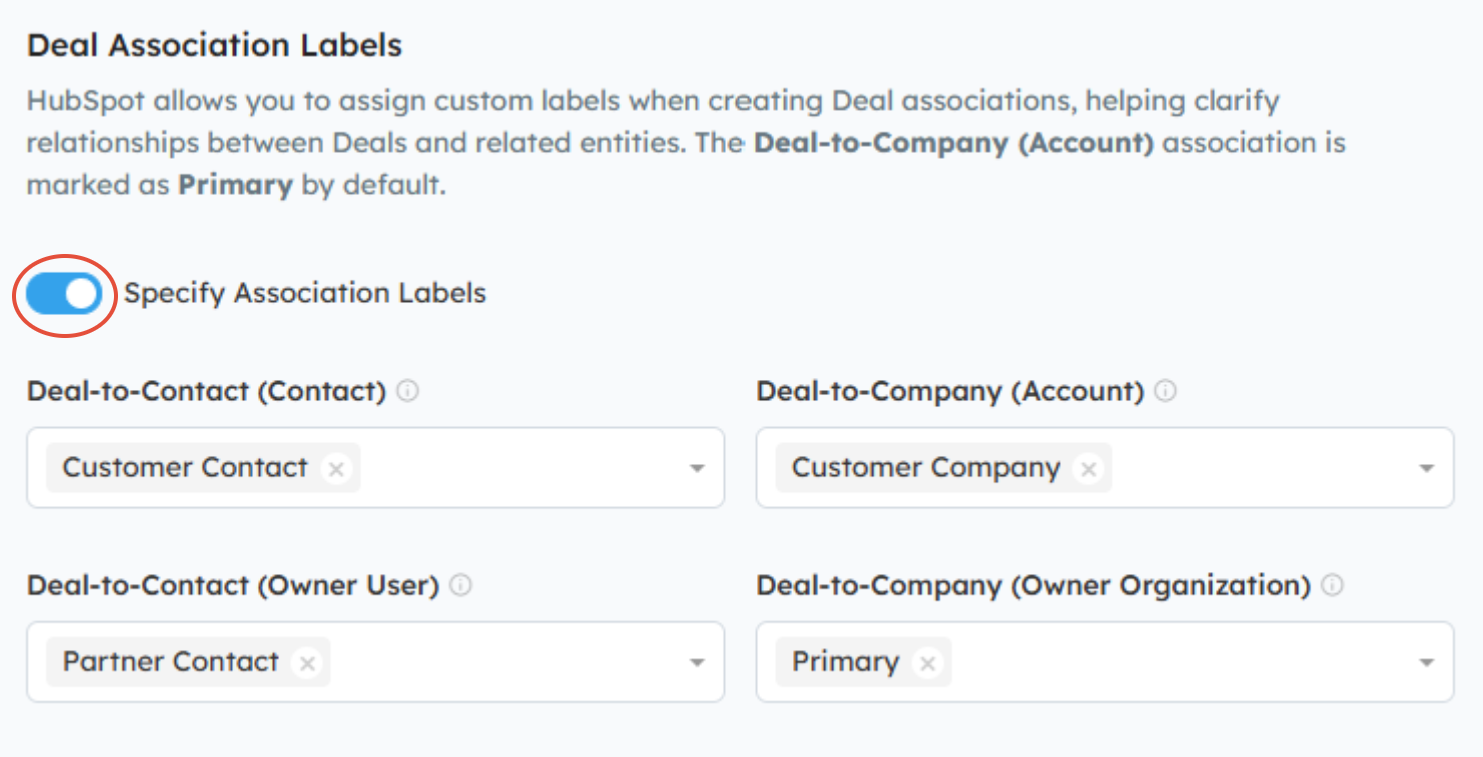
NOTE: Labels do not need to be specified for every entity. You can choose to apply them to only the Company, only the Contact, or any combination that fits your workflow.
Step 4: Configure Field Mappings
You'll then move to the Field Mappings section, where you will specify the flow of data between Channeltivity and HubSpot. The system displays all of the Channeltivity Deal, Account, and Contact fields on the left and all of the HubSpot Deal, Company, and Contact fields on the right. Each mapping is connected by a button that indicates the mapping's sync direction. You can update the sync direction/data flow for existing mappings by clicking on the buttons, and add additional mappings by clicking the "Add Mapping" button.
Learn more about this topic in this article: HubSpot Integration: Field Mapping Configuration.
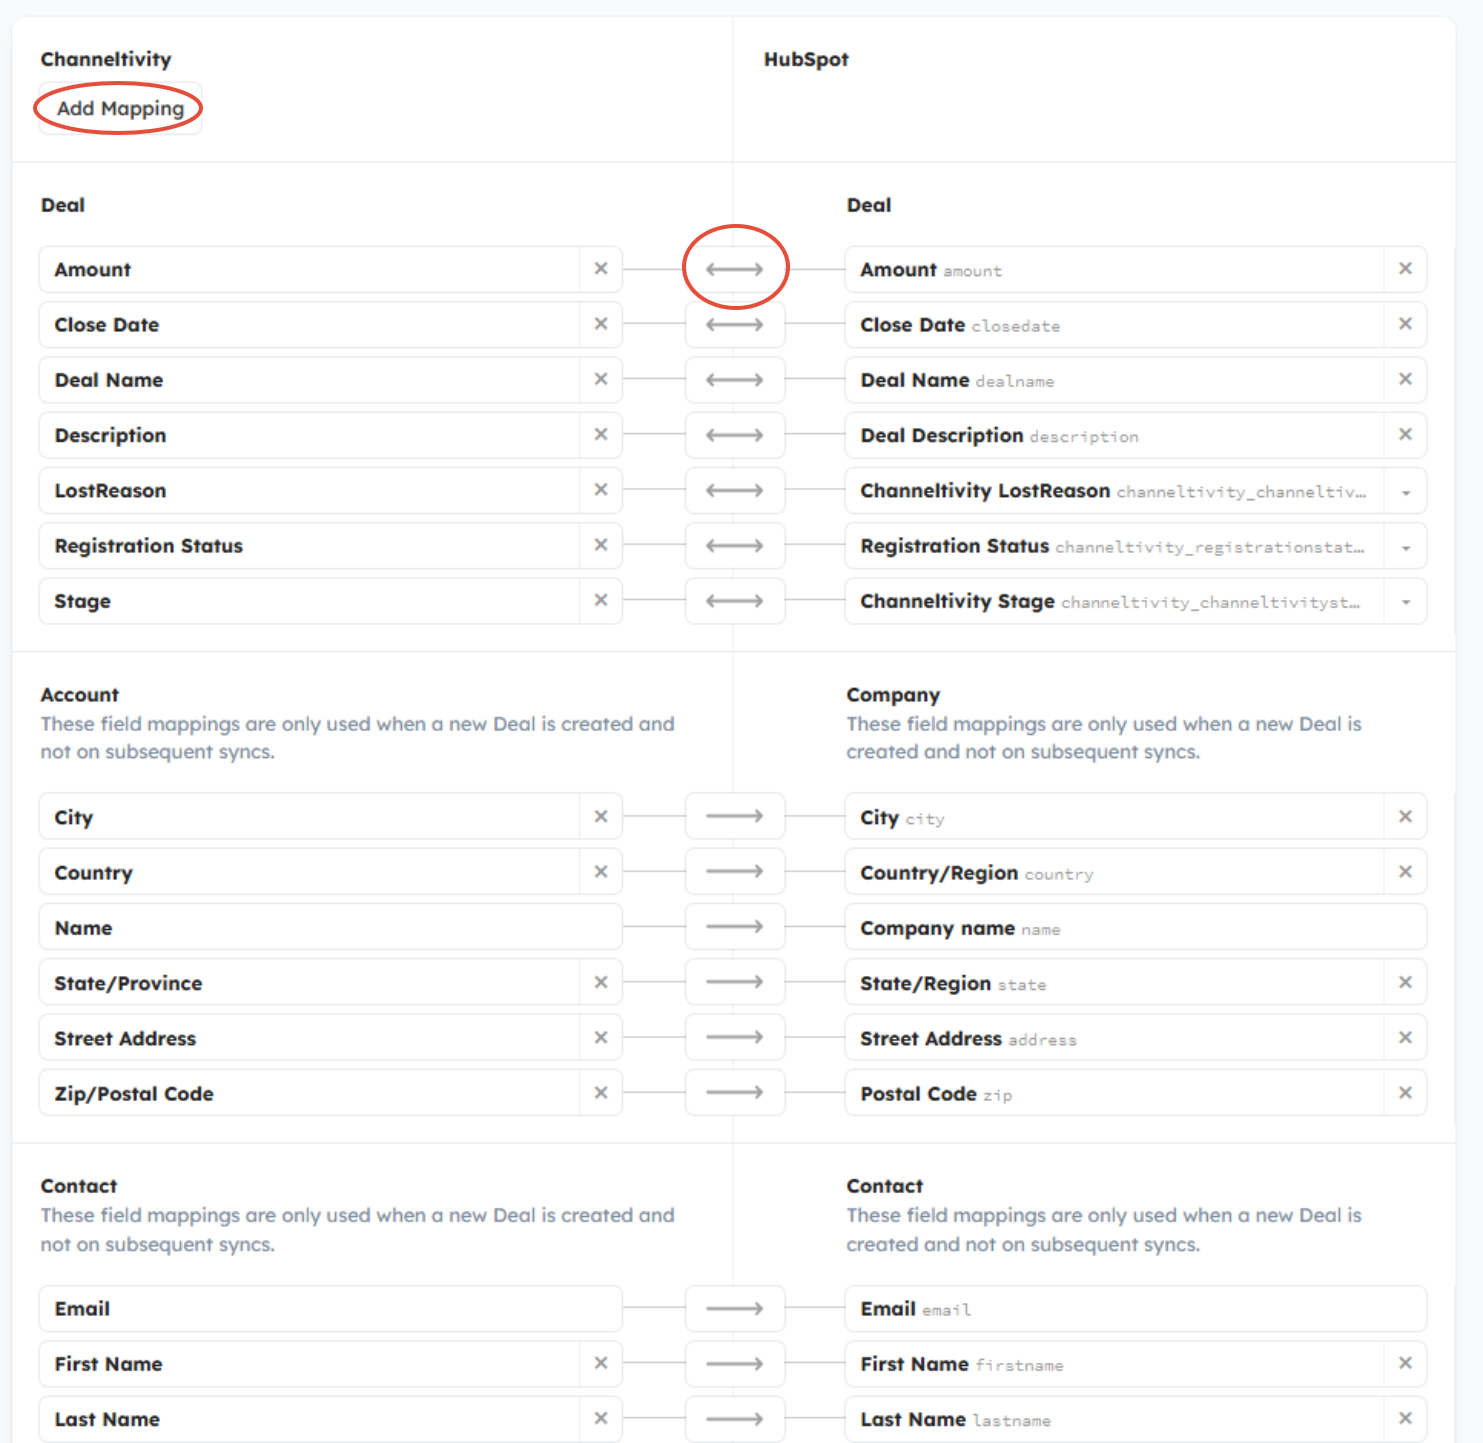
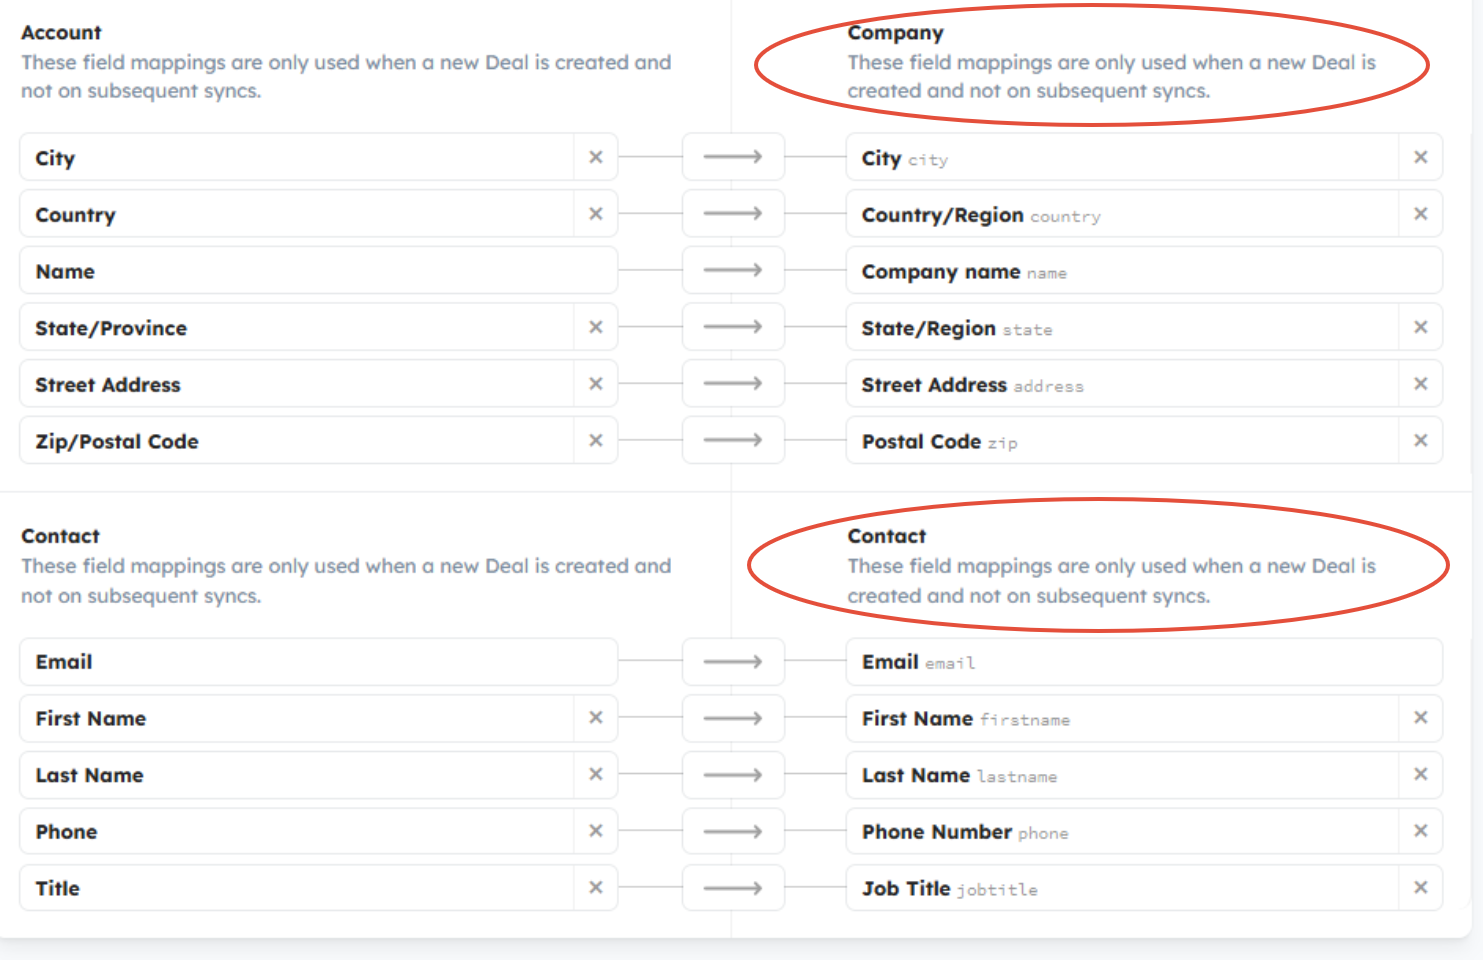
Note: By default, the integration sets the Deal's Company and Contact based on the email address of the Account's Contact in Channeltivity. If a Contact's email address does not exist in HubSpot, Channeltivity will create a new Contact in HubSpot with the Contact's information from Channeltivity. If the Contact doesn't have an email address or if the Contact's email domain is not already associated with a Company in HubSpot, a new Company will be created with the Account information from Channeltivity. Your Account and Contact field mappings determine the data that is pushed to HubSpot to create the Company and Contact.
Once the Company and Contact are created in HubSpot, any changes made in Channeltivity to the Account and Contact are not reflected on the linked Company and Contact records in HubSpot.
Once all your mappings are complete, click the "Save" button at the very bottom of the page to finish the setup process. Depending on the details of your HubSpot configuration, the saving process can take up to 30 minutes. When the setup process is complete, you will be redirected to the HubSpot Integration Settings page.
Step 5: Test the Integration
You're all set! Go ahead and submit a Deal Registration to test out the integration between Channeltivity and HubSpot.
Related documentation:
HubSpot Integration: Deal Registration - Overview
How do I import Deals from HubSpot into my PRM as Deal Registrations?
How Do I assign HubSpot Deals created by Channeltivity to a Pipeline and Stage in HubSpot?
Was this article helpful?
That’s Great!
Thank you for your feedback
Sorry! We couldn't be helpful
Thank you for your feedback
Feedback sent
We appreciate your effort and will try to fix the article