Channeltivity includes full support for SAML 2.0 (Security Assertion Markup Language, an open standard for single sign-on) and can be configured both as a SAML Identity Provider (IdP) and Service Provider (SP). This article explains how to set Channeltivity up as a SAML Service Provider, which allows Users to log into Channeltivity through an external application (the SAML Identity Provider). If you're instead looking to allow Channeltivity Users to log into external applications, check out the article How to configure Channeltivity as a SAML 2.0 Identity Provider.
Step 1: Enable SSO
Logged into Channeltivity as an administrator, go to Settings > Single Sign-On (SSO) > SAML Service Provider.

Step 2: Configure the external Identity Provider
The SAML Service Provider page in Channeltivity has all the information you need to configure your external IdP to log into Channeltivity. Use the Channeltivity SP metadata, certificate and on-page information to populate your IdP with the correct configuration. The terms used by different SAML IdP providers can vary greatly, so it's not always straightforward figuring out what's what, but we're always happy to help! Please contact us if you run into any difficulties configuring your IdP.

Step 3: Add the Identity Provider to Channeltivity
The Channeltivity Service Provider page has all the configuration details and is also where you can manage external Identity Providers. Click the "New Identity Provider" button below to enter the details of the Identity Provider:

For this walkthrough, we'll be using OneLogin, a cloud-based Identity and Access Management solution, as our Identity Provider. We got the correct Entity ID, Single Sign-On Service URL and Certificate from the OneLogin settings pages. In many cases, you'll only use a handful of the IdP settings in Channeltivity. Depending on the requirements of your IdP, you may or may not need to upload a certificate and set the SAML Response signature settings, for example:

Once you've created the IdP configuration in Channeltivity, click into the IdP details:

From there, you can activate the IdP using the Actions menu:

Step 4: Configure auto-provisioning and set any custom SAML Attributes (optional)
When Auto-Provisioning is enabled, Channeltivity will attempt to create non-existent Users during the SSO process. These new Users will be assigned to Organizations based on their email domain. Unrecognized email domains will result in the creation of User Requests, which an admin will need to manually assign to an Organization and approve. You can enable Auto-Provisioning in the IdP settings and also specify which Groups the Users automatically created by the Auto-Provisioning functionality will be added to.
You can define Custom Attributes on the IdP details page to specify how User profile data provided by the IdP should flow into the User's profile data in Channeltivity:

Step 5: Set your login mode
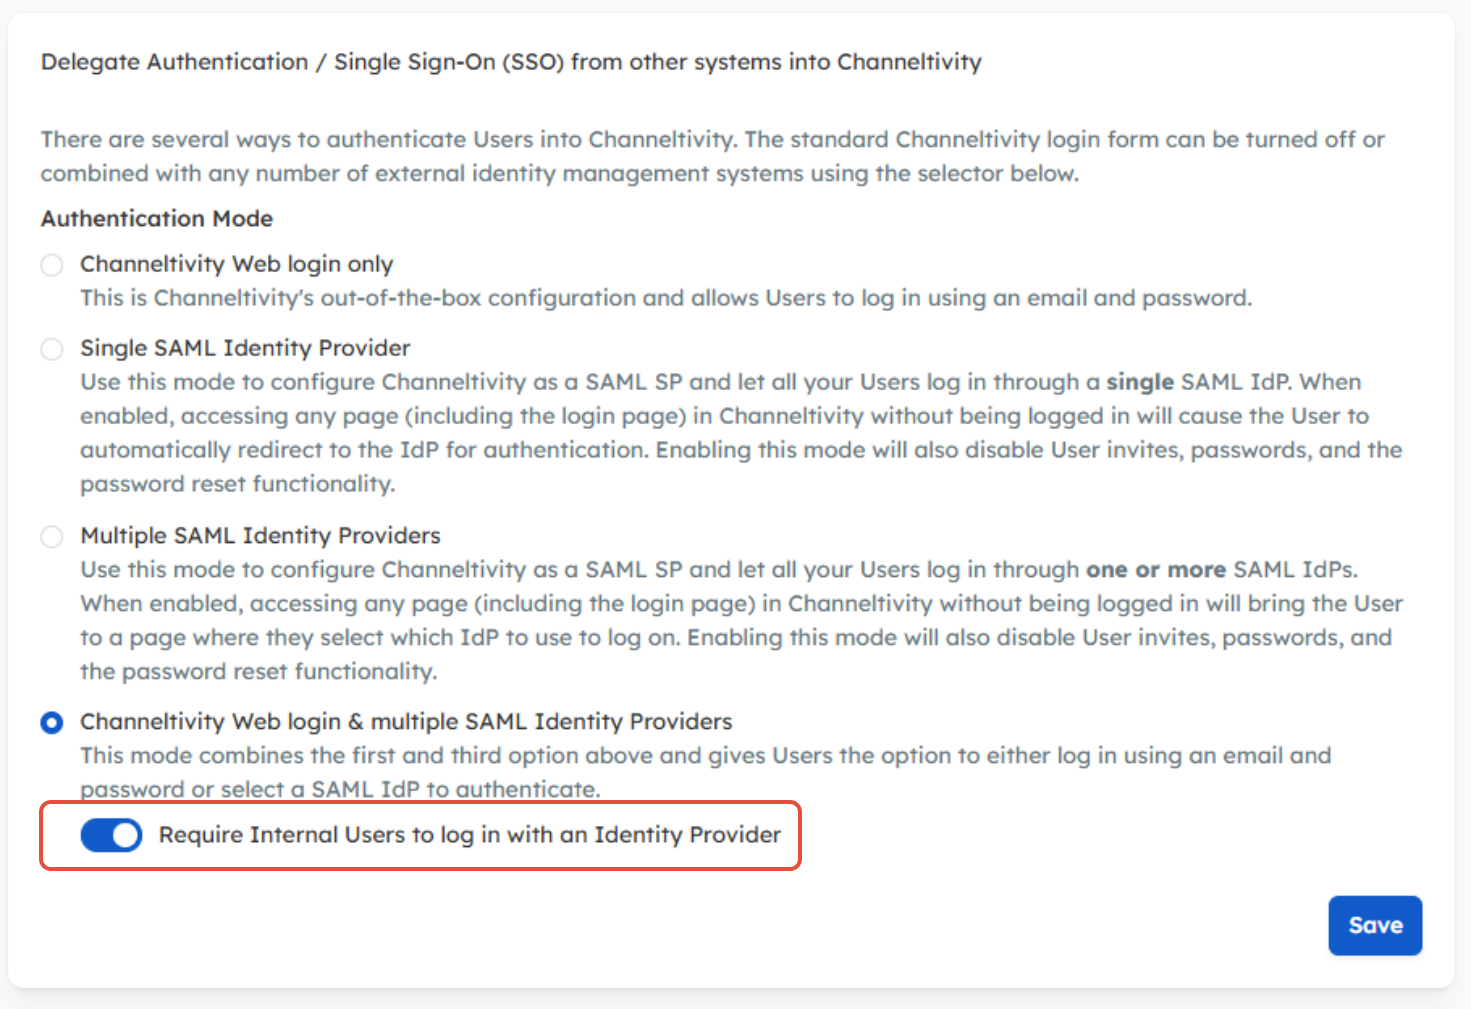
Once you've successfully configured Channeltivity as an SP and defined the IdP configuration, go back to the SSO Overview & Settings page to set the Authentication Mode, which determines how Users log into Channeltivity.
NOTE: To require Internal Users to authenticate via SSO using an Identity Provider, while Partners and Distributors continue to log in using their username and password, check out this article.

Step 6: Test
Once your SSO setup is complete, test it to make sure everything is working and you're good to go! If needed, the Integration Log contains all SAML SSO activity and is helpful in troubleshooting issues.
FAQ
What happens if you try to SSO into Channeltivity but the User doesn't exist in Channeltivity?
The answer is: it depends.
- Without User Auto-Provisioning enabled, a simple error message is displayed indicating that the User doesn't exist.
- With User Auto-Provisioning, if the email domain is matched to an existing Organization, the missing User is created and logged in.
- With User Auto-Provisioning, but if the email domain is not matched to an existing Organization, a User Request is created. An admin will need to review and approve the User Request in order to allow them to log in at their next attempt.
Channeltivity is configured as a SAML Service Provider, but there's something wrong with my configuration and now I can't log into Channeltivity. What do I do?
To prevent the automatic redirect to the IdP, simply add "?NoSSO=true" to the login page URL, like so: https://YourDomain.channeltivity.com/?NoSSO=true
Can I require SSO for Internal Users while allowing Partners/Distributors to log in with a username and password?
Yes. When the Channeltivity Web Login & multiple SAML Identity Providers authentication mode is enabled, you can require Internal Users to authenticate via SSO using an Identity Provider, while Partners/Distributors can continue to log in using a username and password. This allows you to apply different authentication requirements for Internal Users without impacting the Partner/Distributor login experience.
Learn more about this topic here: Can I Enforce SSO for Internal Users Only?.
Was this article helpful?
That’s Great!
Thank you for your feedback
Sorry! We couldn't be helpful
Thank you for your feedback
Feedback sent
We appreciate your effort and will try to fix the article