This article provides instructions for managing home page and other custom page content. For instructions on how to add additional custom pages to your portal, check out: Custom Page Configuration.
Since the home page is the first page Users see upon logging into the portal, you'll want it to be organized, visually appealing, and frequently updated with new content. Use this page to communicate key program details, recently added marketing content, and incentives/promotions. Include call-to-actions to direct Users to specific areas in the portal to register Deals or submit MDF requests. You can also use Permissions to create multiple versions of the page, so that Users only see content that is relevant to their permissions. Click here for more tips and best practices for designing your home page.
To begin configuring a custom page, click the gear icon in the top right corner of the portal's header > Configure Page. 
The Page Configuration menu will open in the right side panel, which includes the following configuration options:

Settings
- Rename the title of the page
- Change the icon used to indicate the page in the left navigation menu
- Show/hide the page title, description, and breadcrumbs
- Remove margins around content (Widgets). Learn more about this topic here.

Layout Editor (see the "Editing Custom Page Content" section below)
- Edit the page layout by adding/removing and resizing columns
- Includes a menu of Widgets that can be added to the page
- Drag and drop Widgets onto the page
Preview Page Content (see the "Previewing Page Content" section below)
- Allows you to preview the page as a different User
Editing Custom Page Content
Adding Widgets
Once you've configured the page Settings, you can begin adding content and configuring the page's layout using the Layout Editor. To access the Layout Editor, click the gear icon in the top right > Configure Page > Layout Editor.

The Layout Editor Widget will appear on the right side panel, which will include a list of Widgets that can be added to the page. You can review a brief description of each Widget to help determine the appropriate Widget to display your content. Once you've decided on a Widget, click and drag it over to the desired location on your custom page.

To edit or remove the Widget, hover over the Widget and click the ellipsis icon (three dots) in the top right corner of the Widget > Edit or Remove.

Segmenting Content
Use the Widgets listed below to segment content and messaging on the page for different user experiences. For example, you can create different welcome messages for your Groups, so that when Users view the page, they only see the message that applies to them.
Note: Learn more about setting permissions and content access here: How do I set Partner Portal Content Access & Permissions?
The four radio buttons listed below give you the ability to set permissions for each message:
- Everyone: The message will be visible to all Users.
- Selected Groups: Only Users in the selected Groups will see the message.
- Smart Permissions: Only Users who match the rules you specify will see the message.
- No One: Only Admin Users and Internal Users with "Widget Content Administration" will see the message.

Adding Columns
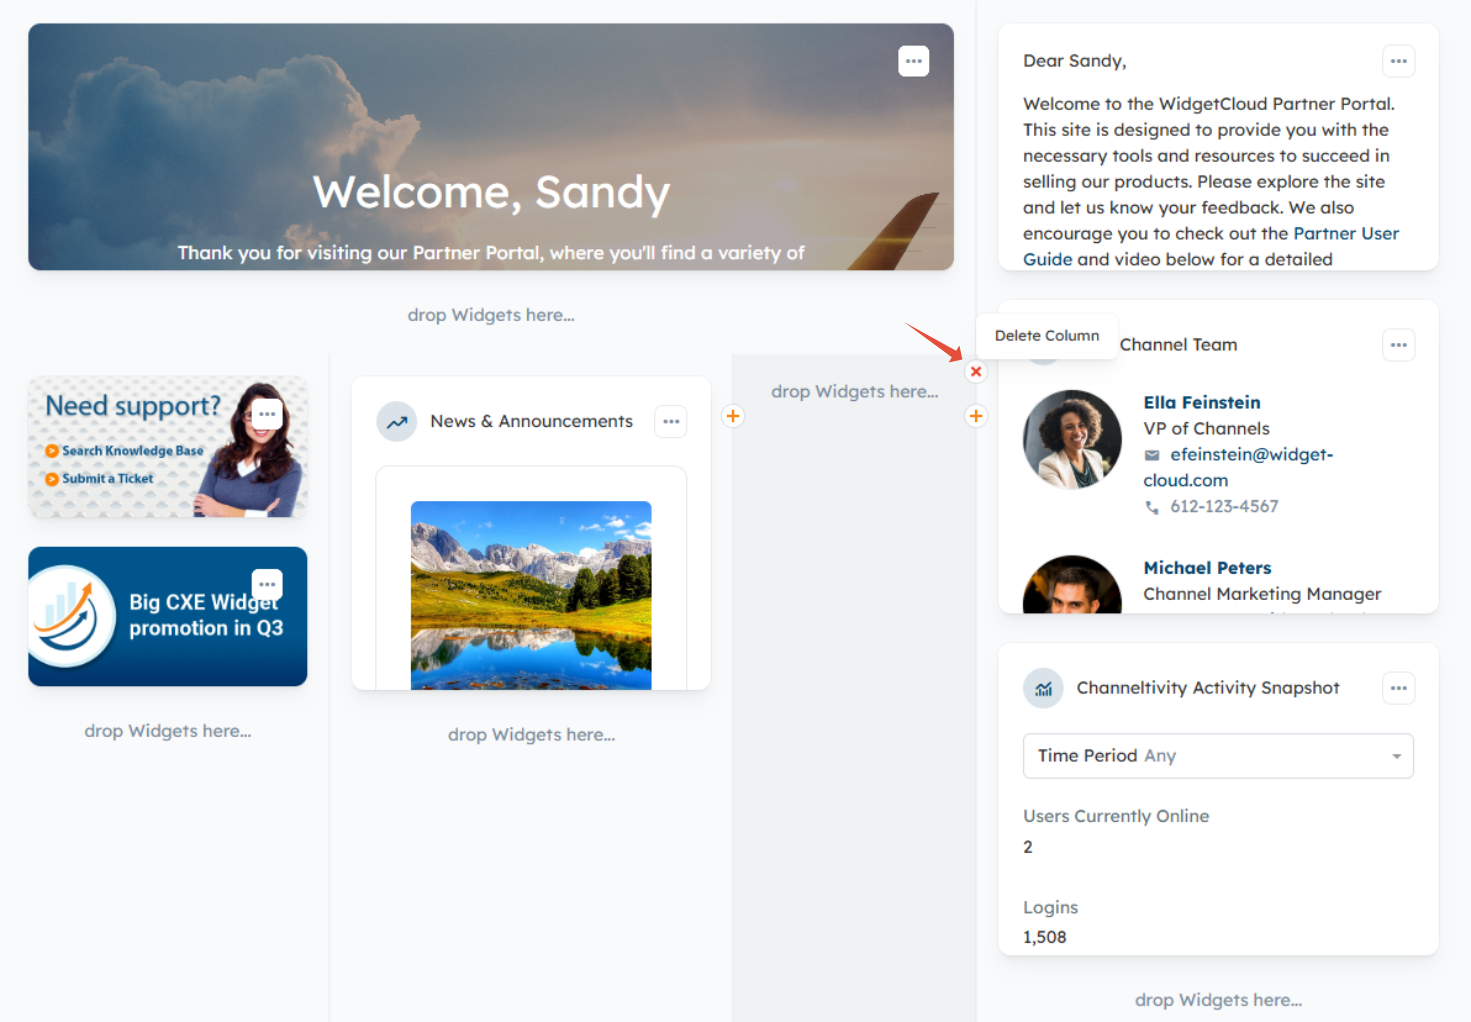
You can divide and section content/Widgets on the page using columns. To add a column, hover your mouse over the line between columns and click the plus sign(+) button.
To delete a column, hover your mouse over the line between columns and click the X button.
If you need to resize columns, click the line between columns and drag the line to adjust the column's width.
Columns can also be split to display Widgets side-by-side by clicking the "Split Columns" button under the "drop Widgets here" areas in a column. 
Previewing Page Content
When you are finished designing your custom page, click the X button in the top right corner of the Layout Editor menu on the right side panel.

You'll then be taken back to the Page Configuration menu, where you'll select "Preview Page Content" to select a User from the dropdown menu to preview the page as a specific User. 

Related Articles:
- Best Practices for Designing your Partner Portal Home Page
- What home page designs are the most effective?
- Custom Page Configuration
- How do I remove margins around content on a Custom Page?
- How do I use the Hero Banner Widget?
Was this article helpful?
That’s Great!
Thank you for your feedback
Sorry! We couldn't be helpful
Thank you for your feedback
Feedback sent
We appreciate your effort and will try to fix the article